
Traditional carpentry, wood-cutting and leather decorating are crafts that require long years of practical training to achieve mastery. However, with laser engraving anyone can create items at a level of quality high. It is easy to operate compared with traditional engraving,even for non-professionals.
Today, our Monport laser will show you the basics working principle of a laser engraver. How to get started with laser cutting in 4 steps, here’s a step-by-step overview of what you need to consider to make it happen!
How does a laser cutter work?
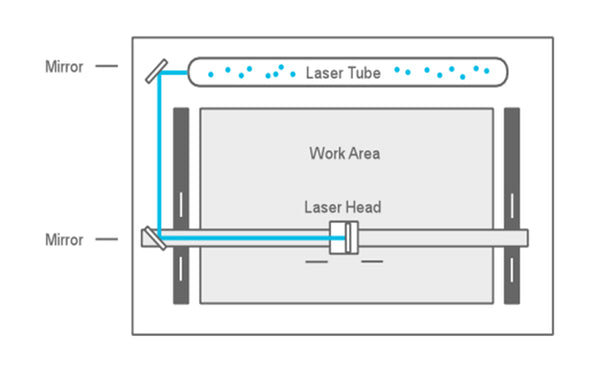
In a CO2 laser cutter machine, the laser beam is created in a tube filled with CO2 gas. Next, with the help of mirrors and lenses, the laser beam is directed to the laser head and focused on the material surface. Electronically controlled motors move the laser head to cut or engrave the desired shape into the material of the workpiece. The shape is defined by an input file which can be a vector or raster image.
How to get started with laser cutting in 4 steps:
1. Get access to a laser cutter
If you are just starting with laser cutting I recommend trying one of the options above before looking into buying a laser cutter to get some experience and find out which features are most important for you.
Even when looking only at CO2 lasers, there is a wide variety of different laser machines available and the selection is continuously growing. The price range is big, with entry-level Chinese imports starting at about 500 EUR/USD and professional grade machines costing several 10,000 EUR/USD.
In this guide, I won’t go into more details, but I plan to write an overview of the different types available on the market and the most important features to consider when buying a laser cutter, in a future post.
2. Choose a material to cut or engrave
CO2 laser machines are capable of cutting and engraving a variety of materials. However, there are also materials which cannot be processed. This may be because the laser can not cut through the metal, or because toxic gases would form. Also, very flammable materials cannot be used.
Depending on the power and other specifications of the machine you are using, the maximal material thickness that can be cut will vary. The power of laser cutters is measured in Watt. Typical power levels range between 30 Watt and 120 Watt. Lasers with higher power are mostly used in industrial applications only.
3. Create your design
Most CO2 laser cutters work very much like your everyday inkjet printer. The laser cutter comes with specific drivers which convert an image from a computer into a format that the laser cutter can read. You can use the software of your choice as long as you export your file in a suitable format. Below are some examples of graphic design software.
2D Design:
- Inkscape (free, open source)
- QCAD (free, open source)
- CorelDRAW
- Adobe Illustrator
- AutoCAD
3D Design:
- Autodesk Fusion 360 (free for hobbyists and small businesses)
- Blender (free, open-source)
- FreeCAD (free open-source)
- Sketchup
- Tinkercad (free)
- Solidworks
- Onshape
4. Cut or engrave it
Once you have your design ready, it is time for the final step – the cutting on the laser. Laser cutters are very powerful machines. You can create great things with them but they are also potentially dangerous, so first a word of warning.
Before using a laser cutter always first make sure you read and understand all the safety instructions that come with it. In addition be aware that that wavelength of a CO2 laser is in the Infra-Red part of the light spectrum, so it is invisible to the human eye ye. The red dot you see with many machines on the material surface is only a positioning aid and not the laser beam that actually doing the cutting.
The four most important settings of a laser cutter are power, speed, frequency and for focus distance.
- Power: Defines the output power of the laser. Typically can be set from 0 to 100% (maximum power). High power is used for cutting thick materials and lower power is used for engraving and cutting of thin materials such as paper.
- Speed: Determines the movement speed of the laser head. For engraving and cutting of thin material, the speed is usually set (close) to the maximum.
- Frequency (Hz, PPI): The frequency parameter specifies the number of laser pulses per second. Frequency depends completely on the material used. For example wood cuts best at around 500 to 1000 Hz and for acrylic 5000 to 20000Hz are recommended to achieve a smooth edge.
- Focus: As previously explained, there is a focusing lens inside the laser head. The focus point (where the laser beam is thinnest) should be on the material surface or slightly below, for most applications. To ensure this the material needs to be a certain distance away from the lens. The exact distance depends on the type of focusing lens that is used.
Many laser machines have a motorized bed which can be moved up and down to set the focus distance. Alternatively the position of the material surface a has to be manually adjusted.
So now that you have a basic understanding of the available settings you might ask yourself how to find the right settings for your projects? A good starting point is the laser cutter manual. Often you will find suggested settings for many materials. If you are working on a shared laser in a makerspace there are usually lists with recommended settings available.
Time to Cut !
Finally, you should be prepared to make your first cuts. It can take a few tries to find the ideal settings for your material. Always change only one parameter in a test process. For example, start with the power by testing different values in 5-10% increments. Once your are happy with your results, don’t forget to write down your settings in Monport laser community, discussing with other hobbyists!